3 Easy HubSpot Workflows for Sales Enablement
Marketing automation systems like HubSpot have nearly endless functionality, and it’s easy to feel overwhelmed. The time and effort saved by automating processes contribute to the ROI of the tool—and of your marketing overall—but you don’t have to have a mega-complex, fully automated inbound setup to get value out of HubSpot. It’s easy to get started with a few automated processes that add value and build from there.
Here are three simple workflows to help add value to your sales and marketing functions and enable your team to target more effectively and communicate better with prospects.
What is a HubSpot Workflow?
A HubSpot workflow is a tool for automating actions and processes in HubSpot. You can use a workflow to accomplish a wide variety of tasks in HubSpot, including bulk setting properties, sending email campaigns, automating webinar registrations, and setting follow up tasks for team members.
Workflows begin with a trigger that signals the workflow to begin. For simple contact-based marketing workflows, triggers usually fall into one of two categories:
- Attribute: A characteristic that is true about a contact, such as a contact property or list membership.
- Event: An action the contact takes, such as an email or ad click, form submission, website visit, or webinar registration.
HubSpot workflows are a powerful feature, and they can get complex. But they don’t have to be intimidating—for this exercise, we’ll be focusing on a few basic, contact-level workflows that you can put in place quickly.
How Do You Access HubSpot Workflows?
You can access workflows in the HubSpot Marketing Hub Professional or Enterprise levels. Depending on whether you have access to other automation tools like sales sequences, you’ll find workflows either at the top level of the navigation or nested underneath the Automation menu from your HubSpot dashboard.
Tip: If you’re using Marketing Hub Free or Starter, you can still take advantage of some simple automations to get you started. One great example is follow-up emails after a form submission. Read more from HubSpot on this topic.
Start here: Easy HubSpot Workflows for Sales Enablement
HubSpot offers a lot of in-depth functionality to get a full picture of contact engagement, but you don’t need to tackle it all at once. These two simple HubSpot workflows take just a few minutes to set up and give your sales team immediate visibility into which contacts are engaged with your emails and website.
-
Website Visit Alert
HubSpot tracks contacts with cookies and can tell when they return to the website. This workflow sends an automatic notification to your sales team when a contact visits the website, alerting them that the contact might be returning for more information and ready for a personal follow-up. Important: You must have the HubSpot Tracking Code installed on your website for this workflow to function. Additionally, contacts who have blocked or opted out of cookies will not be included in this workflow.
Here’s how to set it up:
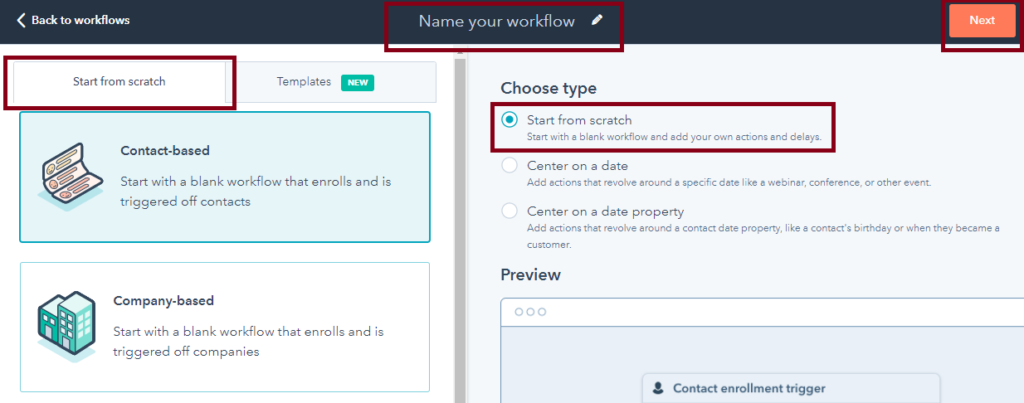
1. Create a new workflow and select “Start from Scratch.” Name your workflow and click “Next.”
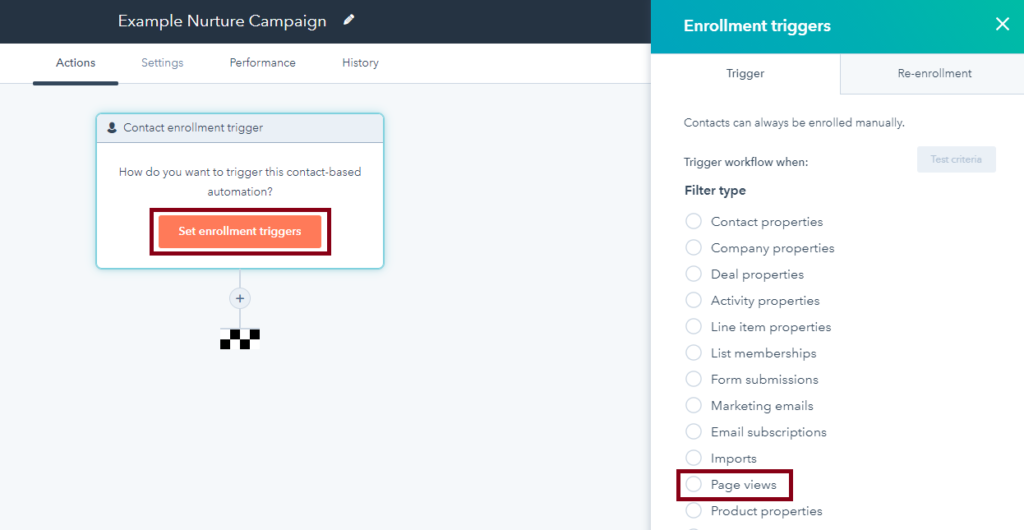
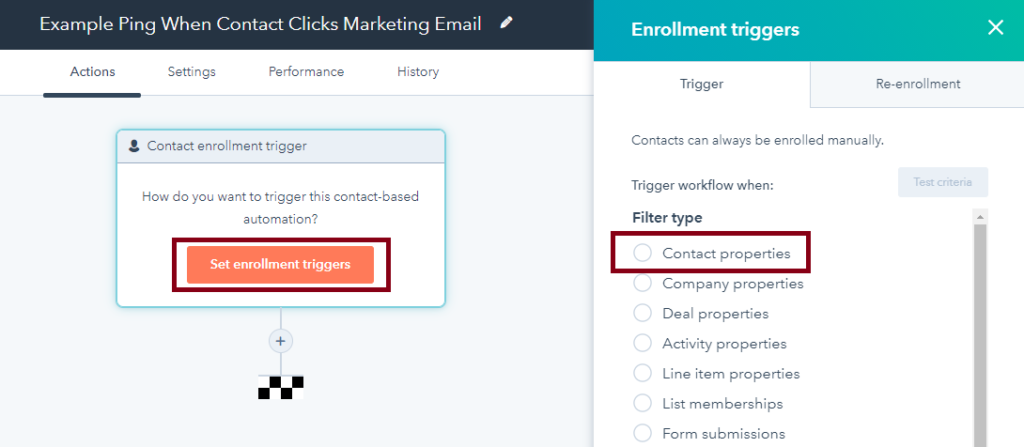
2. Click “Set enrollment triggers.” Set your trigger as “Page views,” select “Contact has viewed at least one URL containing,” and add your website domain.
3. Optional: Take it a step further and specify which pages you want to be included to narrow the focus to more qualifying pages. For example, if Magnetude wanted to notify the sales team only about contacts who visited our Capabilities page, instead of specifying “contains magnetudeconsulting.com,” we would specify “contains magnetudeconsulting.com/capabilities”. Use the “or” feature to add multiple qualifying pages, such as Portfolio, Features, Pricing—any pages a contact might visit if they were considering a purchase.
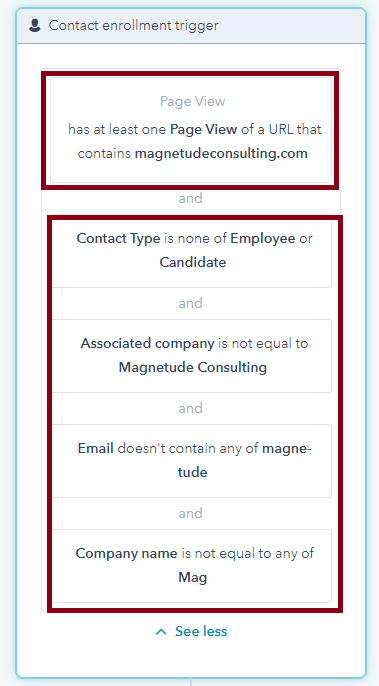
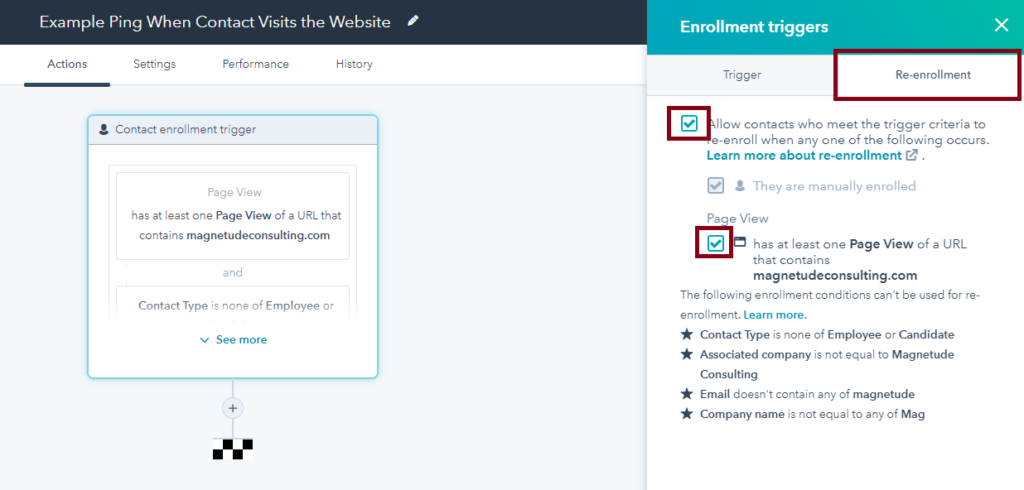
4. Still in the trigger stage, exclude a few properties like company and email to filter out your employees and other categories of contacts that the sales team doesn’t need to pursue. Depending on how your contacts are set up, you may need to use different properties to fully exclude everyone, so it can be helpful to let the workflow run for a while and then go back and update this section. See the Trigger image for how Magnetude filters out employees and candidates.
5. Flip to the “Re-enrollment” tab of the trigger section. Check the box to allow re-enrollment, then check the box to trigger re-enrollment from the page view. This will allow contacts to go through this workflow more than once, meaning if a contact visits the website today and next week, your sales team will get the email twice.
6. Click the Plus sign to add a short (15-minute) delay. This prevents the annoyance factor of several emails in a row if a contact clicks around and visits multiple pages. You can also customize this delay to suit your sales team’s process.
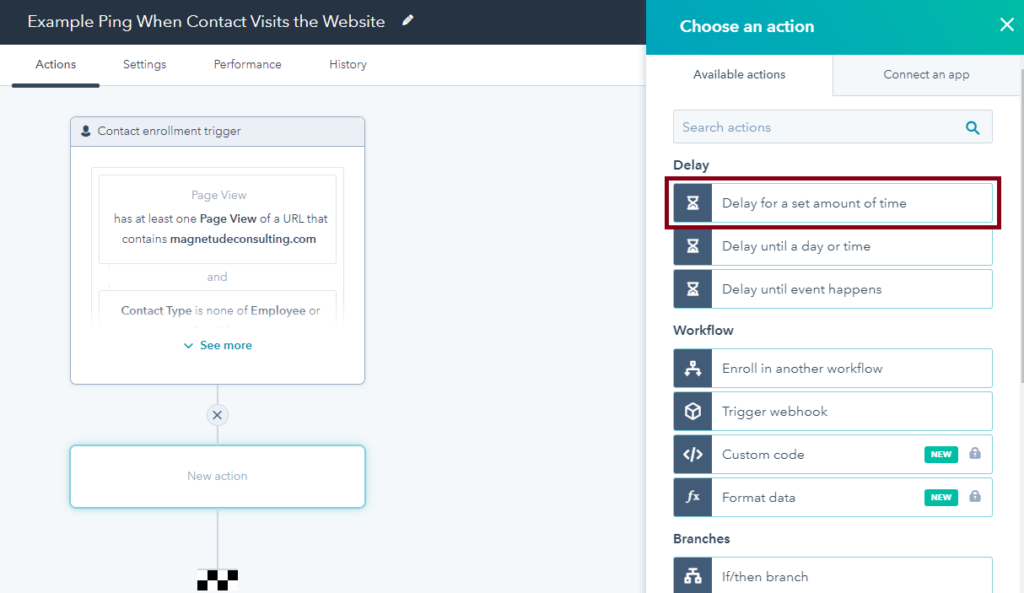
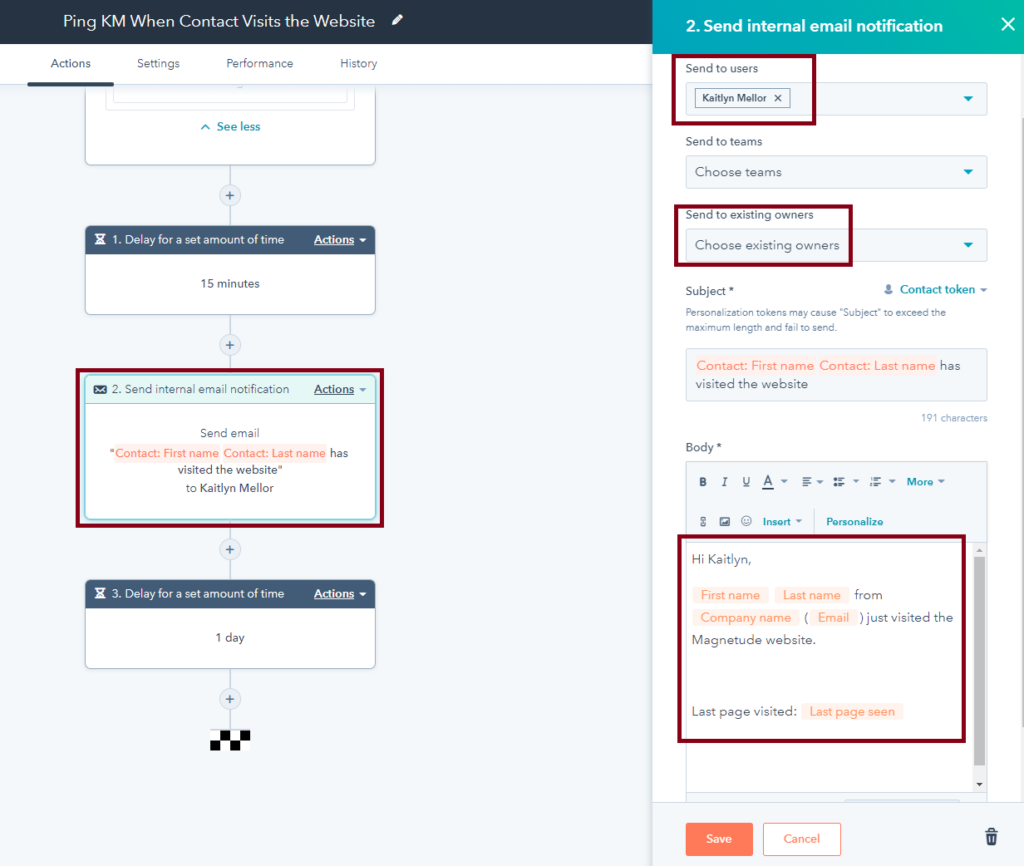
7. Click the Plus sign and select “Send internal email notification”. Select the user you’d like to receive the email or use the “Send to existing owners” function to specify to send the email to the contact owner. Important: If you use “Send to existing owners,” make sure that most of your contacts already have an owner, or use an additional step to automatically set a contact owner before sending the email. If a contact doesn’t have an owner, the email will not be sent.
8. Write your email notification. Use contact tokens to insert valuable information that the recipient might need, such as name, company, last page seen, or LinkedIn profile. Click “Save”.
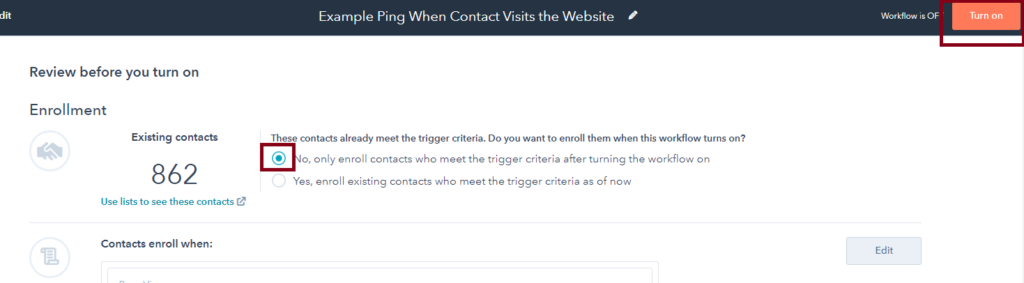
9. Click “Review” in the top right corner, then turn on your workflow! Select “No” for enrolling existing contacts—otherwise your sales team will get an email for every contact who has ever visited the website all at one time.
-
Marketing Email Click Alert
This workflow works similarly to the Website Visit Alert, but it is triggered from a click on a marketing email rather than a website visit.
You can either set the workflow to email sales for every marketing email click, or you can set a threshold—for example, they get notified after a contact has clicked three marketing emails. The threshold will depend on a variety of factors, such as how frequently you send emails and how engaged your mailing list is. If you want to narrow your workflow but you’re not sure where to set your threshold, we recommend starting with a low threshold of two or three email clicks, then adjusting if you’re receiving too many notifications to be valuable.
1. Create a new workflow and click “Set enrollment triggers.” Select “Contact properties.”
2. Select “Last marketing email click date,” then click “Is known” and apply the filter.
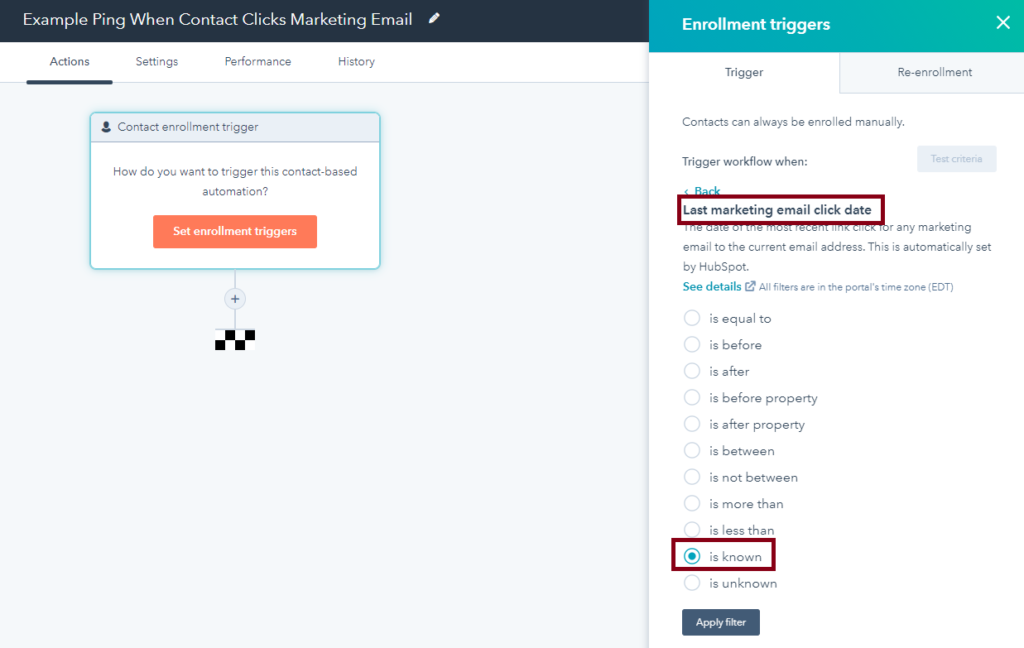
3. Optional: Further narrow the filter by number of emails clicked if you want to only notify sales when a contact has clicked more than one email. From the trigger section, click “AND” to add another contact property, select “Marketing emails clicked,” use “is greater than,” and enter the number of marketing emails. Here is how your trigger will look:

4. Repeat steps 5 – 9 of the Website Visit Alert workflow, adjusting your internal email notification accordingly. Step 6, adding a delay, is optional, but can be helpful if your sales team would like more built-in wait time between the email click and the sales follow up.
Ready to Take it a Step Further? Try a Nurture Campaign!
-
Basic Nurture Campaign
A nurture campaign is a series of follow ups, resources, and stories to warm up a lead and help move them further down the sales funnel. The most common use case for a nurture campaign is an asset download—when a contact submits a form to download one of your eBooks, they probably aren’t ready for a hard sales pitch right away, but they are thinking about your company, so you want to stay in front of them. With a nurture campaign, once a contact downloads the asset, they will then get a thank-you email and several additional messages with valuable content, resources, stories, and Calls-to-Action (CTAs). Then, by the time your sales team does follow up with the contact, they are more familiar with your company.
A simple, 3-touch nurture campaign might look like this:
- Trigger: Form submission to download a piece of content
- Step 1. Thank-You email with a link to the content
- Step 2: Three-day delay
- Step 3: Follow-up email recommending a related content piece
- Step 4: One week delay
- Step 5: Email recommending an additional content piece and offering a chance to request a demo
- Step 6: Assign a task to the sales team to follow up (or simply add to your existing marketing email list)
Start by planning out your nurture campaign and writing the emails you will include. Once you have your email flow mapped out, here’s how to set up the HubSpot workflow:
1. Create, test, and finalize the emails you will send using the standard Email tool in HubSpot. Important: Be sure to select “Automated” for email type. Next, instead of sending the emails, select “Save for Automation.” Your emails will now be published and ready to use in workflows.
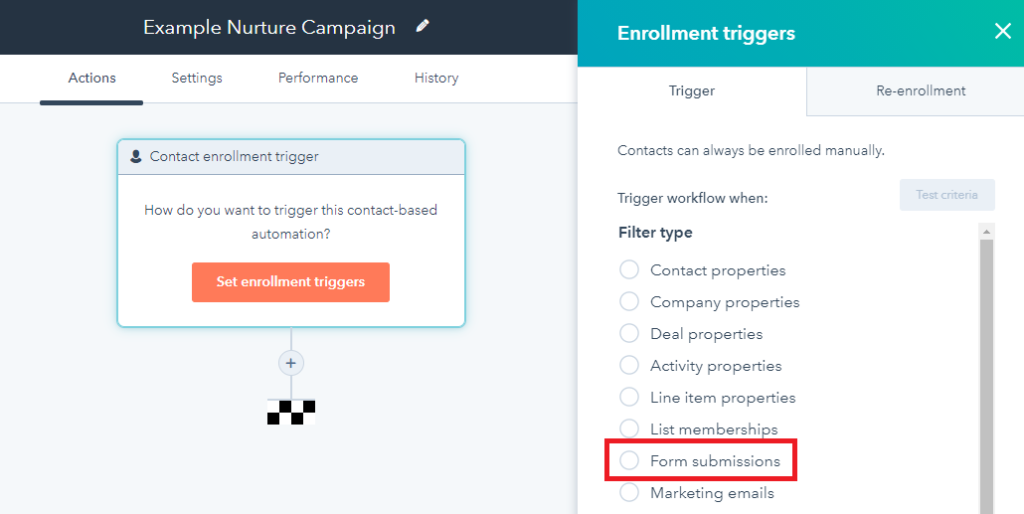
2. Return to the workflow and set your trigger, usually a form submission. Choose the form that corresponds with your content, specify which page (if applicable), and click Save.
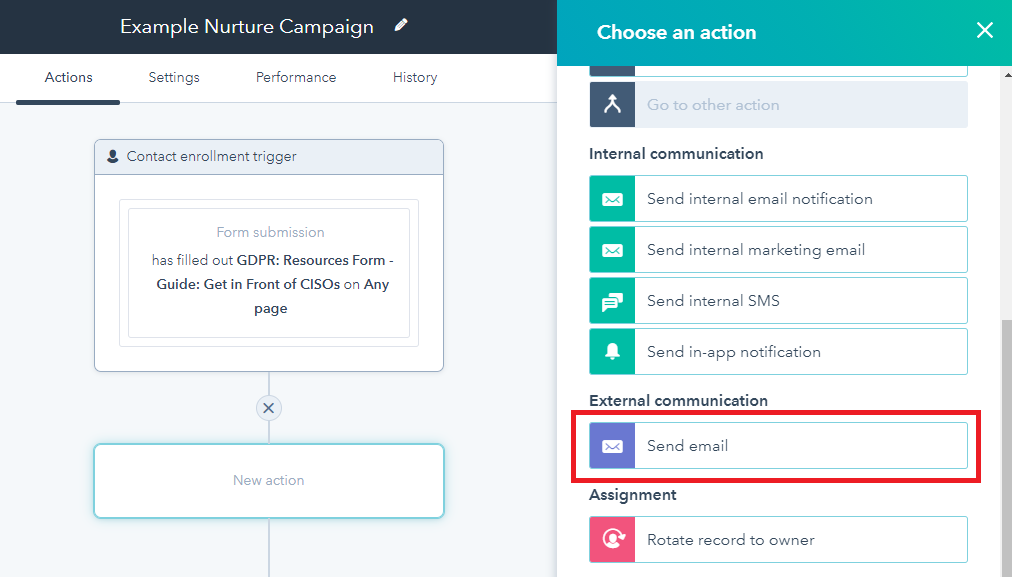
3. Click the plus sign to add your first action, and select “send email.” Select the email you’d like to send and click Save. Tip: If you’re not seeing the email you want, be sure you selected “Save for Automation” in the Email tool.
4. Click the plus sign to add a delay. 2 – 5 business days is usually recommended.
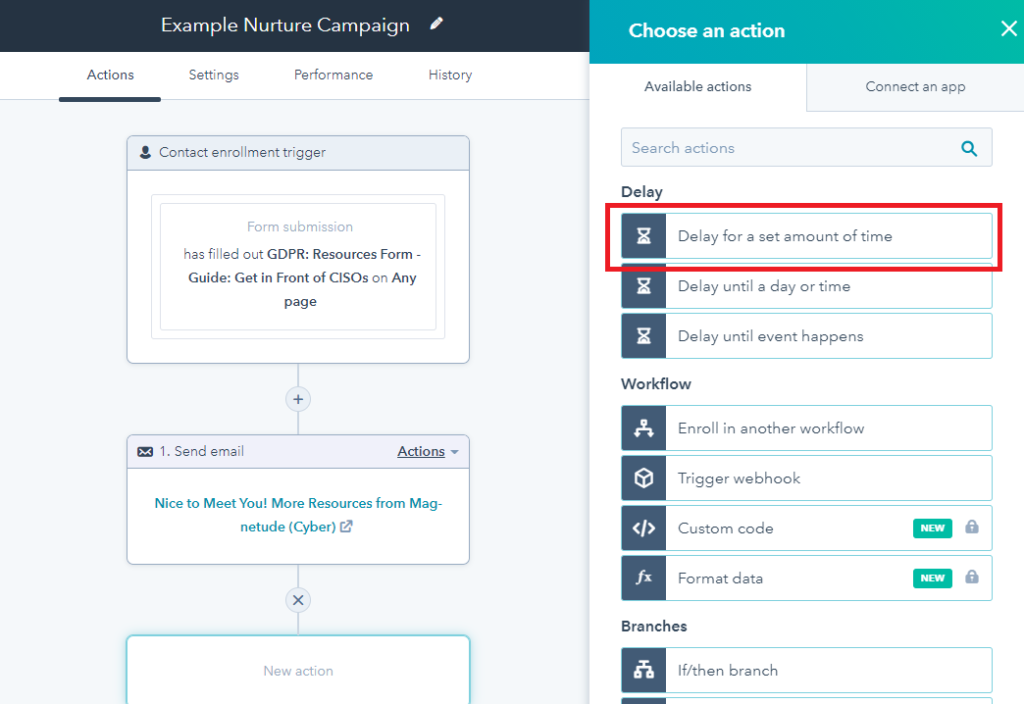
5. Repeat steps 3 and 4 until you have built out your whole email campaign.
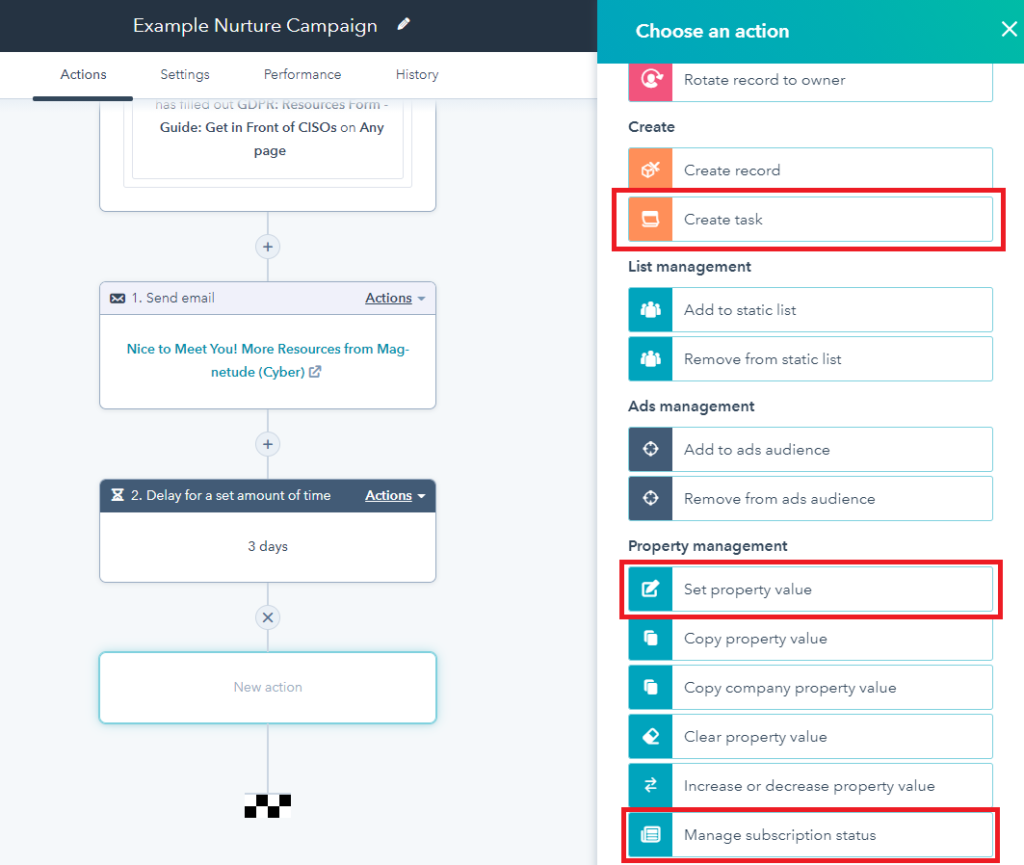
6. At the end of the workflow, select an end action to be sure your warmed-up lead doesn’t go cold again: either set a contact property or subscription status so they flow into your standard email marketing list, or create a task for the sales team to follow up via phone or email.
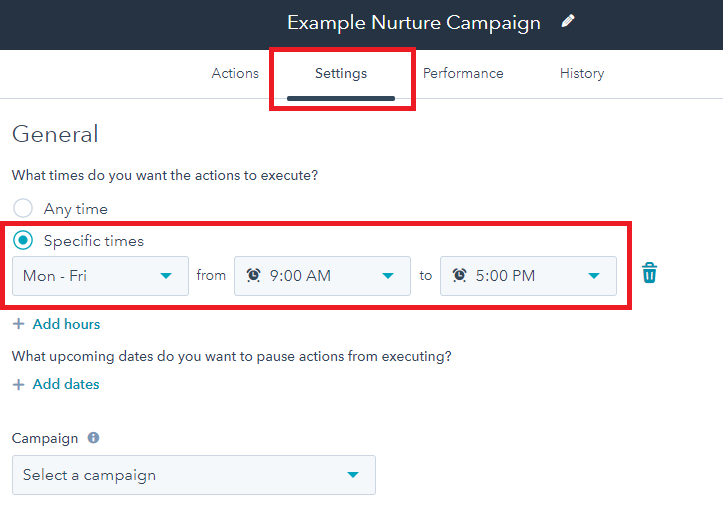
7. Optional: Change your workflow settings to specify when you want actions to execute. This is helpful if you want your contacts receiving emails only Monday-Friday or if you want to skip certain days (like upcoming holidays).
8. Click “Review” in the top right corner, then turn on your workflow! Important: Read the options carefully before turning on the workflow, especially whether to enroll contacts who already meet the trigger criteria. If you are setting up a nurture campaign for an existing form, you don’t want contacts who downloaded the resource months ago to begin receiving emails out of the blue. Consider a different engagement strategy for these contacts instead.
Like any of these workflows, nurture campaigns can get quite complex. Depending on your needs, you can add steps like branching to send different emails depending on the contact’s engagement or properties, sending the sales team a notification to connect with the contact on LinkedIn, or adding the contact to an advertising audience. See what works for you (and your sales team) and adjust accordingly.
What do I do next?
Workflows are infinitely customizable, so we encourage you to give a few a try to see how they work. Monitor your workflow over a period of time to see if it’s adding value for the team. Make updates as needed, considering the sales team’s process and the information they need to be successful.
A word of caution: HubSpot workflows can get complicated quickly, and they don’t end unless manually turned off—though they won’t complete any actions unless new contacts meet the trigger criteria. If you’re not using a workflow, turn it off and move it to an archive folder or delete it. Be sure to keep tabs on which workflows you have firing at a given time, and regularly review your workflows to be sure they are:
- Functioning as intended—using the correct triggers, lists, contact properties, and internal team members
- Relevant, including up-to-date content in emails and the right information at the right time
- Not at odds with each other (e.g. sending one contact down two separate nurture paths simultaneously or updating properties that conflict with other workflows)
- Adding value—for example, there’s no sense in sending the sales team an alert if it’s just adding noise to their inbox
When you’re ready to move into more complex marketing automation, you can begin to add workflows and processes. Eventually, you can expand your marketing automation into a fully functional inbound marketing process with in-depth lead scoring, multiple nurture paths, and automated alerts to make the process easier—for your team and for your prospects. As you grow, it can be enormously helpful to work with a professional with in-depth marketing expertise and HubSpot know-how to help you strategize, optimize, and execute your inbound marketing processes at the right pace for your business.
Looking for some support through your next steps with HubSpot, marketing automation, or sales enablement? Contact us.