How (and Why) to Link Zoom and HubSpot for Webinars
A well-run webinar is a beautiful thing, and by setting up an integration between Zoom and HubSpot, you make communication, tracking, and follow-up for webinars easier and more effective.
Digital events are flourishing in today’s landscape, and webinars have quickly become a go-to for many marketers for lead generation and thought leadership. One webinar platform recently saw the number of webinars increase by 330% and the average number of attendees double from March 2019 to March 2020.
We’ve seen the growth personally, too—we recently promoted a client webinar for only two weeks and saw 306 registrations, 166 attendees, and 32 questions submitted in advance. Success—by any measure.
If you decide to run a webinar, you want to set it up right from the beginning. To save you from endless technical support calls, we put together this blog post to help you connect HubSpot and Zoom accurately.
Note: We use Zoom because we and most of our clients use it but have also worked with GoToMeeting and others. HubSpot is our go-to because…shameless plug—we’re a HubSpot Top Digital Agency—but the process is similar for other marketing automation tools as well.
Jump to Section
- Integrate Zoom and HubSpot.
- Create a Zoom webinar.
- Set up confirmation and reminder emails.
- Create your registration form, landing page, and thank you page in HubSpot.
- Create a workflow to connect registrations from HubSpot to Zoom.
- Create a list of all webinar registrants in HubSpot.
- Host your webinar!
- Create lists of who attended the webinar and who did not.
- Send a follow up email with your webinar recording.
- Send a series of emails with related content to nurture your leads.
Why Should You Set Up a Zoom and HubSpot Integration?
So why does it matter to link these two systems for a webinar? Basically, you want all your tracking and activity to be reflected and measured in HubSpot without manual intervention.
- Contact records are automatically updated. The integration tracks webinar registrations right in a HubSpot contact record automatically. For example, if Jane Doe signs up for the webinar, you can see that registration along with all of her other activity.
- Follow up is easier. You can create Active Lists of all webinar registrants, attendees, and non-attendees and send them any follow-up emails automatically. If Zoom and HubSpot aren’t integrated, you have to upload all registrants into HubSpot manually before sending follow up.
- You can remove anyone who has already signed up for your webinar from your webinar promotions. With this integration, you can easily exclude the active list of webinar registrants from any future webinar recruitment emails since you’ve already converted them!
- You can create a beautiful, branded registration page in HubSpot. Zoom’s registration pages leave much to be desired, in our opinion. Accept registrations through HubSpot landing pages—and make them as beautiful as you’d like—instead of relying on Zoom.
How Do You Connect Zoom and HubSpot?
This is fairly obvious, but in case it’s not, you need to have Zoom and HubSpot accounts. You must be a Super Admin or have App Marketplace permissions in HubSpot and have admin permissions in Zoom.
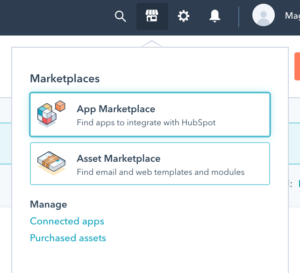
Log in to your HubSpot account. Go to the house icon in the top right corner and click “App Marketplace.”
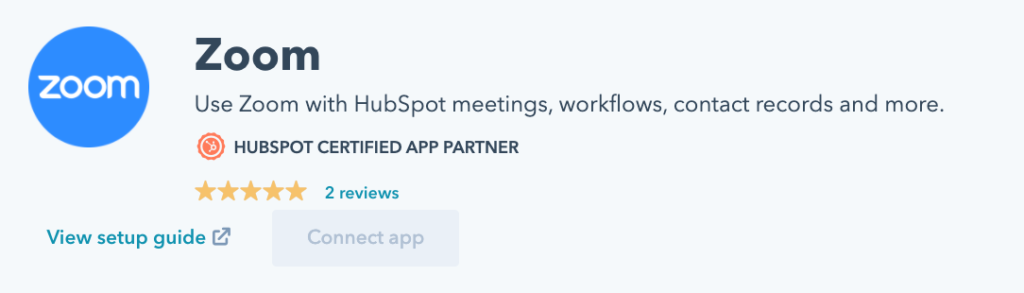
Search for Zoom and select it. Choose the “Connect App” button (ours is gray because it’s already been connected).
In the dialog box, click Connect to Zoom. Enter your Zoom login credentials, then sign in. Click “Allow” to give HubSpot permission to access Zoom.
Back in HubSpot, Zoom will appear under your Connected Apps.
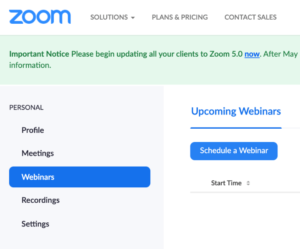
Log in to your Zoom account. In the top right corner, click My Account. Then on the left bar, click Webinars (note: you must have the webinar functionality which is an add-on to a basic Zoom account.) Then click Schedule a Webinar.
Add topic, description, date, and choose the webinar duration (note that if you are planning for a 30-minute webinar and you go over the allotted time you’ve set, don’t worry, nothing will happen!).
A few options that are VERY important to mention here:
- Webinar registration: Choose this option if you want a unique login URL to be generated for each registrant—we recommend requiring registration as it offers more security and works
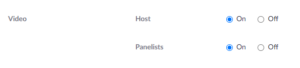
just as easily with the HubSpot integration. However, if you want to be able to send the same confirmation email and reminders to every person with one generic link (i.e. if you’re setting up a customized confirmation email via HubSpot), don’t require registration. Note that this is an area where we have experienced/seen a lot of confusion! Send us questions if you have any. - Video: You can choose to turn the video on for hosts and panelists if you want your hosts and panelists to have video capability. We find that’s a great option for engagement.

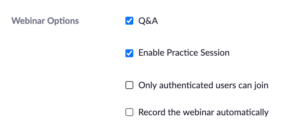
- Q&A: If you want attendees to be able to ask and have questions
- answered by hosts and panelists during the session, choose Q&A. It can be distracting to answer in real-time during the session, but you can always follow up with attendees individually with answers. You can also add someone on your team as a panelist to moderate questions. They can read through the questions privately, respond via chat to attendees, and select a few questions to answer at the end of the webinar as time permits.
- Enable practice session: This seems like it would let you dry run your webinar before the session, but it’s not at all what it seems. Enabling the practice session simply makes it possible for the hosts and panelists to log in to the Zoom webinar early without attendees hearing and seeing what’s happening. It’s a nice feature—we recommend it. You have to click the “broadcast” button when you’re ready to go live with attendees.
- Record the webinar automatically: Surprisingly, we don’t recommend recording the webinar automatically. Why? If you do, the moment you start the webinar, it is being recorded…including those awkward moments when you’re testing and prepping. That means you have to edit the file before you can share it with anyone. We recommend pushing the “record” button a moment before you’re ready to go live. No editing necessary! (Also, when you click “record,” there are two options— 1) Record to the Cloud; and 2) Record to your computer. We recommend the Cloud option because Zoom gives you a handy link featuring the webinar and a built-in transcript after the session. That’s a no-brainer option, if you ask us.)
Click “Schedule Webinar.” Note that you can always go back and adjust these options if you decide you want to.
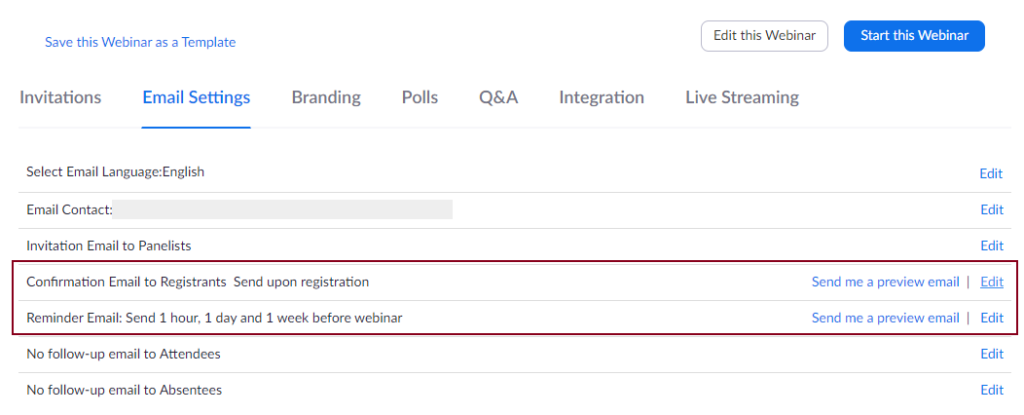
We recommend using Zoom, not HubSpot, to send confirmation and reminder emails to registrants—it automatically embeds calendar invites, which HubSpot doesn’t currently support. Click to edit your Zoom webinar, then click “Email Settings” near the bottom. From here, you can view the confirmation and reminder emails and customize with your chosen message. Zoom automatically turns on the confirmation email and calendar invitation after registration, but you’ll have to manually turn on reminder emails—click “Edit” and select when you want your emails to send.
Back to HubSpot! Log in and create your registration form, landing page, and thank you page as you normally would.
Tip: Include a form field for people to submit questions in advance. This gives you fodder for your webinar content and to kickstart the Q&A portion of your webinar.
Now for the magic—don’t worry, it’s easy!
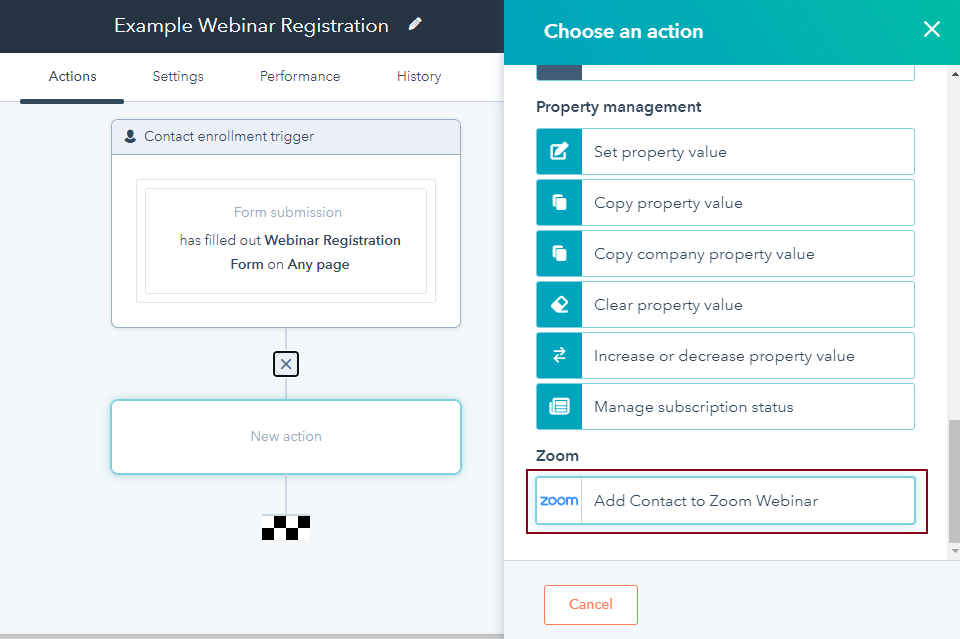
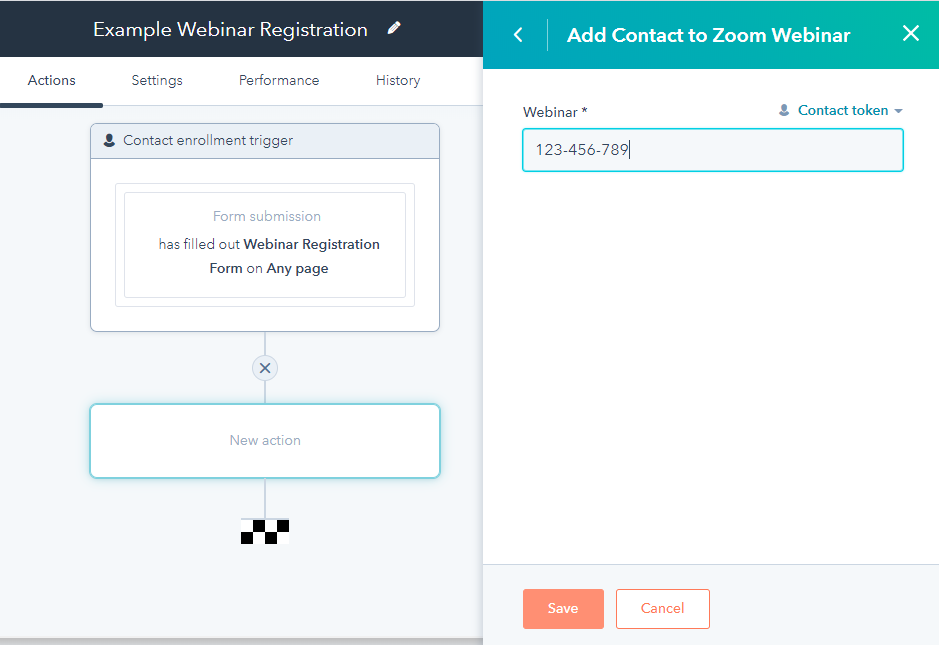
- Set up a new workflow in HubSpot with a “Form Submission” enrollment trigger.
- In the “Form Submission” trigger, find the form you used for registration.
- Select “Contact has filled out the form on” and find your landing page (or select any page if you haven’t used the form anywhere else. Click “Apply Filter.”
- Click the plus sign after the enrollment trigger to add a new action.
- Scroll to the bottom of the actions and select “Add contact to Zoom webinar.”
- In the Webinar box, enter the Webinar ID from Zoom.
- Click “Save” and turn on your workflow.
Tip: At this point, it’s a good idea to test your workflow and confirmation emails. Go through your landing page to register yourself for the webinar, then check that you’re showing up as registered in Zoom and that you received the confirmation email from Zoom with a calendar invitation.
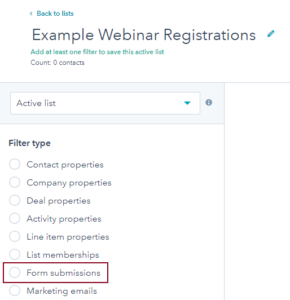
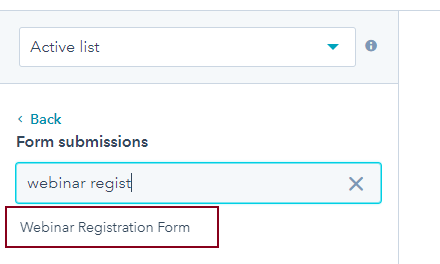
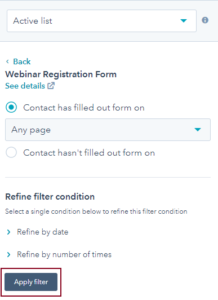
Create an active list and use the “Form submissions” filter to select your registration form. Click “Apply filter,” then save your list.
This allows you to easily see how many contacts have registered for your webinar and gauge lead quality and source. And as we mentioned earlier, you can exclude this list of contacts from future webinar promotions since they’ve already signed up.
You can also see all your webinar registrations in Zoom, but HubSpot makes it easier to export and track your contacts.
Pre-Webinar Tips and Tricks
Promotion & Timing
We recommend a series of three emails to your target audience to promote your webinar and share registration details and a link to the landing page. We’ve found that it’s a best practice to start promoting about three weeks out and to space your communications approximately one week apart. The last email can be a “last chance” opportunity one to two days before the webinar.Don’t forget about other options to promote your webinar. Post a link to your landing page on social media, ask your host and panelists to share the webinar with their networks, and depending on your goals, target audience, and budget, consider paid advertising options.
Schedule dry runs.
Plan one or two dry runs in advance, ideally one week and one to two days before the webinar to make sure you (and your panelists) feel comfortable with the technology and logistics. Duplicate your webinar so you have all the same settings in place, invite any panelists and/or a moderator from your team, and run through the presentation to ensure the content doesn’t need to be trimmed.
Practice, Practice, Practice
Run through your script a few times to be sure you feel confident. Focus on your presentation style, and don’t forget to smile! Even if they can’t see you, attendees will be able to hear it in your voice.
Set up somewhere quiet and log into Zoom fifteen minutes before the official start time to set up your presentation and start your video if you’re using it. When you’re ready to begin, remember to click “broadcast” after you’ve set up and record to the Cloud just as you’re kicking off the webinar.
Congratulations! Your first webinar is complete.
Thought you were done? Think again—following up after the webinar is half the battle.
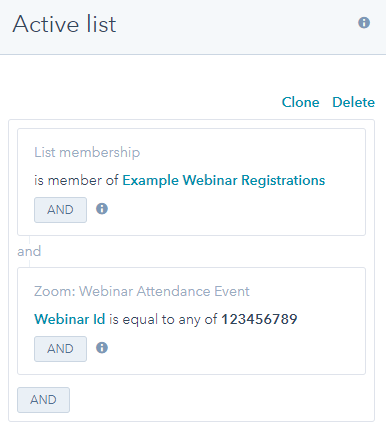
To create a list of contacts who attended your webinar in HubSpot, create a new active list and filter it by contacts on the original webinar registration list you created. Click “And” to add “Zoom Webinar Attendance Event” as an additional filter. Select “Webinar ID” and “is equal to any of,” then type in the webinar ID number (without dashes). Click “create option” and save the filter.
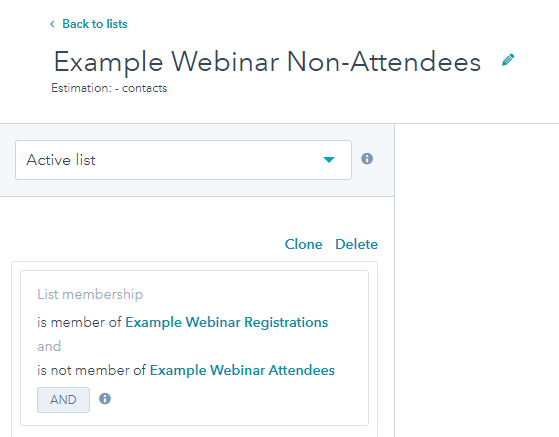
Then, create another active list of non-attendees by filtering your list by contacts on the original registration list and NOT on your newly created attendee list.
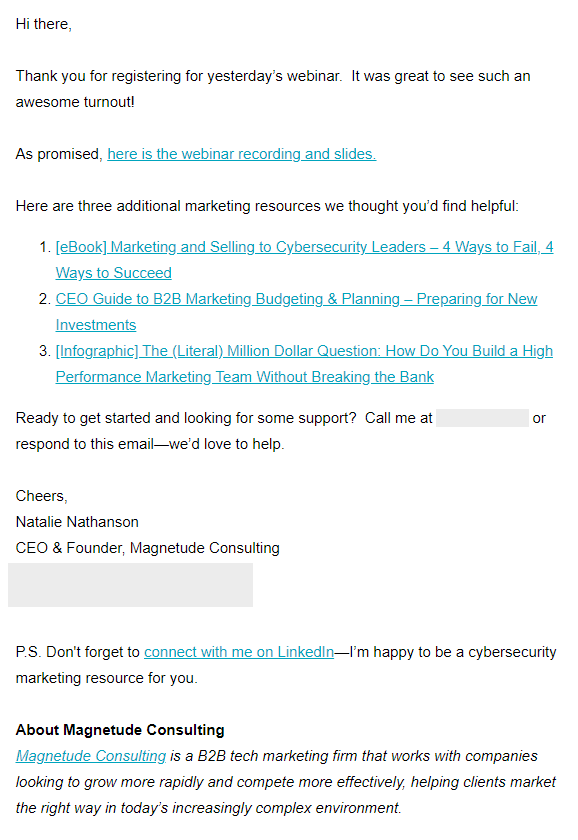
To keep those warm leads engaged, send a follow up email to your registration list within a day or two of the webinar to thank them for registering. In your message, include the link to download the webinar recording right in your email or set up a landing page for them to access it when they want to. Finally, encourage them to reach out to you with any questions post-event.
Here’s an example of a follow-up email we’ve sent after a webinar:
In HubSpot, create a couple of automated emails that share related content, success stories from your company’s work, or other relevant information. Set them up in a workflow to send every week or so to keep your company and content top-of-mind. Watch for engagement with your post-webinar nurture campaign to gauge which attendees would be worth pursuing further.
Don’t forget: A well-executed nurture campaign can save you time in the future, too. If a new contact fills out the form on your website to access the webinar recording or other relevant content, you can enroll them in the existing workflow and send them the same campaign without lifting a finger. Now that’s convenient!
Digital events bring a lot of value to attendees, and when your topic is on point and you set up the technology correctly from the onset, they bring you a lot of value, too.
Ready for more great ideas? Check out our very own webinar: You Can’t Market Without Content—Why Content Marketing Is the #1 Way to Get New Business (and How to Get Started)!